Timor-Leste (East Timor) is making strides to overcome a long-standing digital divide. For years, this young Southeast Asian nation has grappled with low internet penetration, high costs, and slow speeds – a stark contrast to its more connected neighbors. However, recent developments such as the rollout of a submarine fiber-optic cable and the arrival of satellite internet services promise to transform the country’s digital landscape. This report provides a comprehensive overview of the state of internet access in Timor-Leste as of 2025, covering usage rates, infrastructure, service providers, challenges, government initiatives, the impact of satellite internet (e.g. Starlink), regional comparisons, and emerging opportunities for improving connectivity.
Internet Penetration Rates and User Demographics
Internet usage in Timor-Leste remains relatively low but is on a gradual rise. As of early 2025, approximately 486,000 individuals in Timor-Leste were using the internet, representing 34.5% of the population datareportal.com. This means roughly two-thirds of citizens are still offline. Notably, this figure is a downward revision from an earlier estimate of ~742,000 users (54.2% penetration) reported in 2024 datareportal.com. The discrepancy reflects updated data methodologies – the reality is that many Timorese maintain multiple mobile subscriptions (for voice/SMS or different providers) which previously led to overestimation of “internet users.” In any case, around 900,000 people (65% of the populace) remain without internet access in 2025 datareportal.com, underscoring the significant room for growth.
After writing myNextcloud setup guide, people have asked me whether they can install Nextcloud on shared hosting, like cPanel.
Some people don’t want to pay for an additional server to host Nextcloud. That doesn’t mean they should be left out in the cold and having to forego their privacy by relying on 3rd party tools, like Dropbox, Google Drive and Microsoft’s OneDrive.
In this post I will show you how you can install Nextcloud on shared hosting platforms, like cPanel and Plesk.
Why Install Nextcloud On Shared Hosting?
There are many of reasons why someone would want to install Nextcloud on shared hosting, some of these may be:
Shared hosting is cheap
Shared hosting comes with lots of storage
You don’t have to administer the server
Backups are very simple
The best part of all this is that the process is actually really simple! If you don’t already have a shared hosting package, I can personally recommend both Unlimited Web Hosting and NameCheap.
Installation
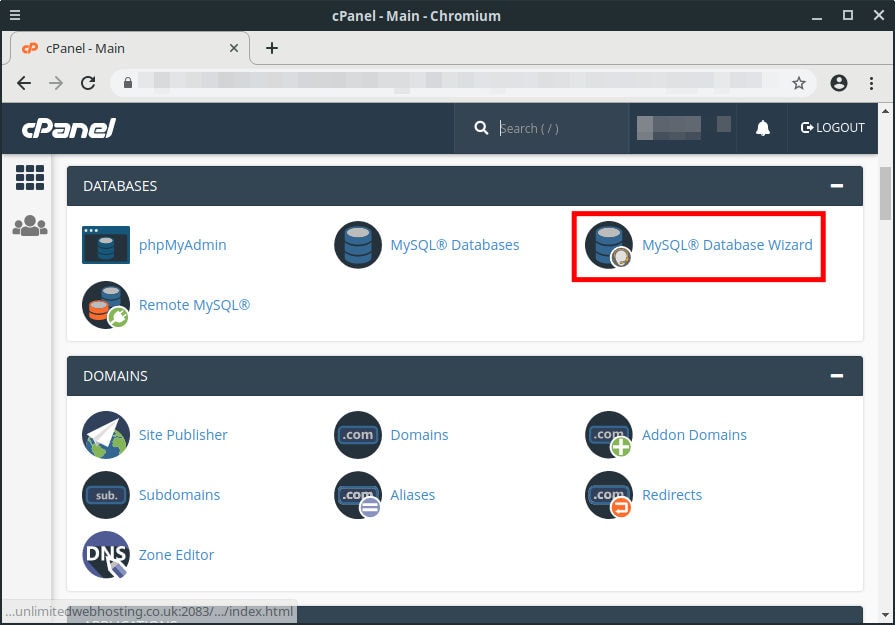
The first thing you need to do is log in to your shared hosting account (in this example I will be using cPanel) and create a database. Nextcloud requires a database to store all the administrative data.
Database
Find the MySQL Database Wizard within your cPanel account, click it and follow the on-screen instructions to setup the database. Make sure you note down the database name, user and password as you will need those later.
Domain
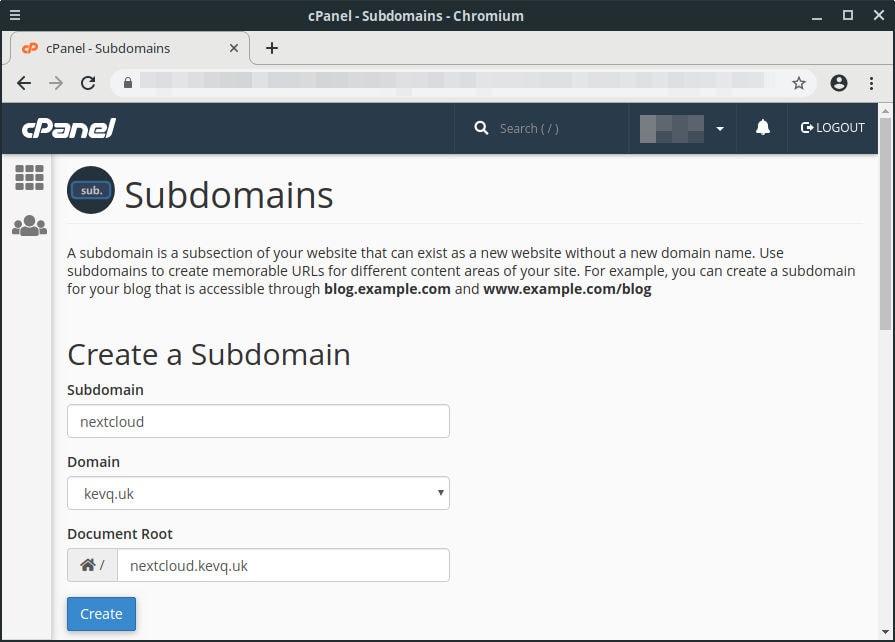
Now we have create the database, we need to setup a domain, or sub-domain, for the Nextcloud instance to use.
Again in cPanel, go to the Subdomains section and add the subdomain you wish to use. In this example, my subdomain is nextcloud.kevq.uk.
Both cPanel and Plesk support free TLS certificates; make sure you configure this so your Nextcloud domain is using HTTPS before you run the web installer.
Install Wizard
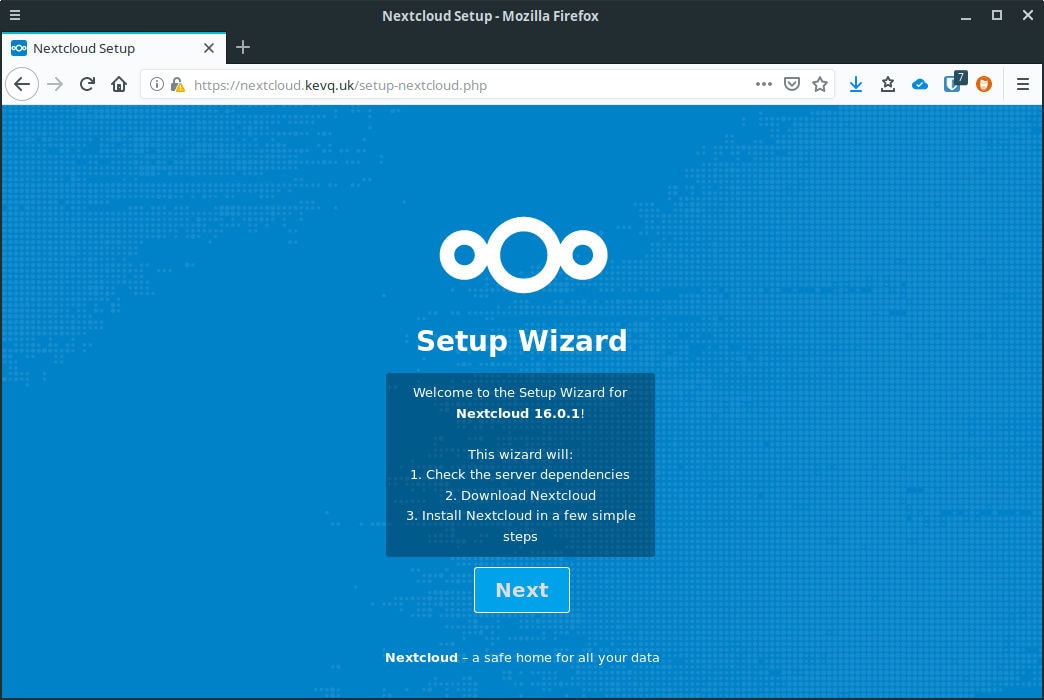
Now we have the domain, database and TLS certificate configured, it’s time to run the Nextcloud web installer.
Upload setup-nextcloud.php to the directory you specified for the Nextcloud domain
Point your web browser to your-nextcloud.domain.com/setup-nextcloud.php
Click Next on the welcome screen to get started with the install wizard.
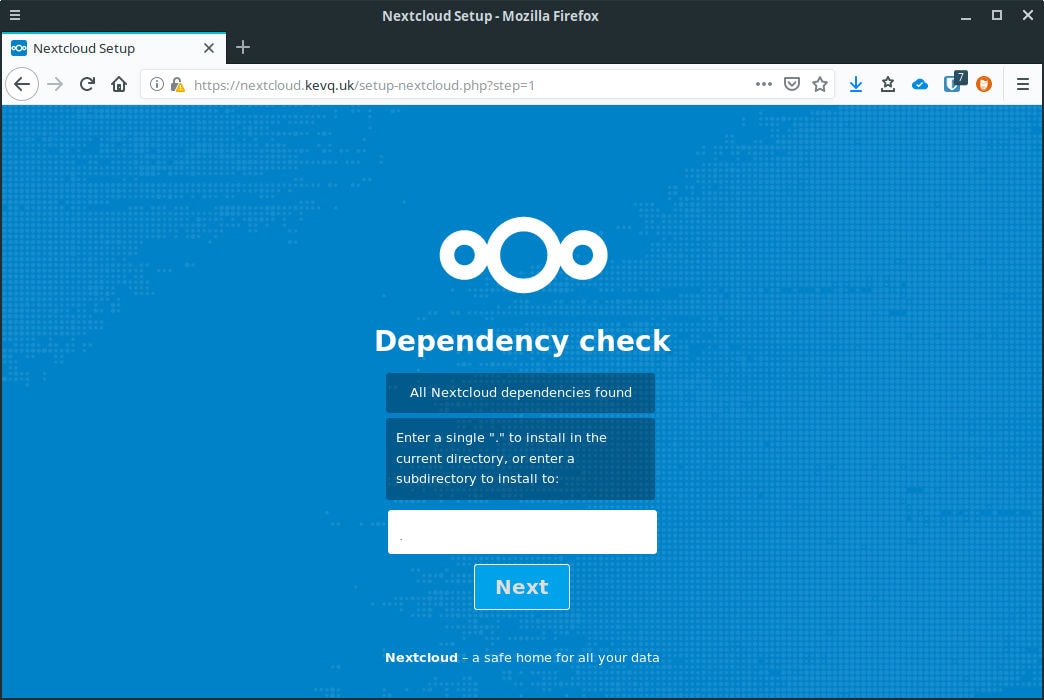
The installer will then run a dependency check to make sure your shared hosting account has everything it needs for Nextcloud to work.
You will also be asked which directory you want to install Nextcloud in. By default this will be your-nextcloud.domain.com/nextcloud. Personally, I change this field to be a single dot, so that Nextcloud is installed to the top level of the domain.
That way, you don’t need to go to /nextcloud every time you want to visit your instance.
After a minute or so, you should see a message saying the installation was successful.
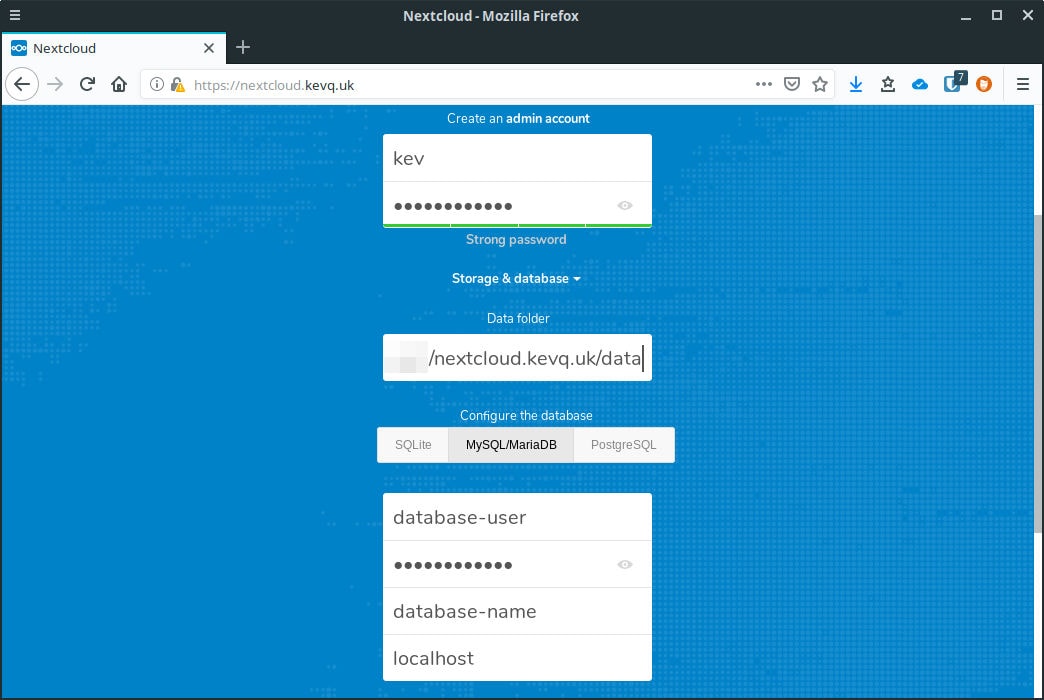
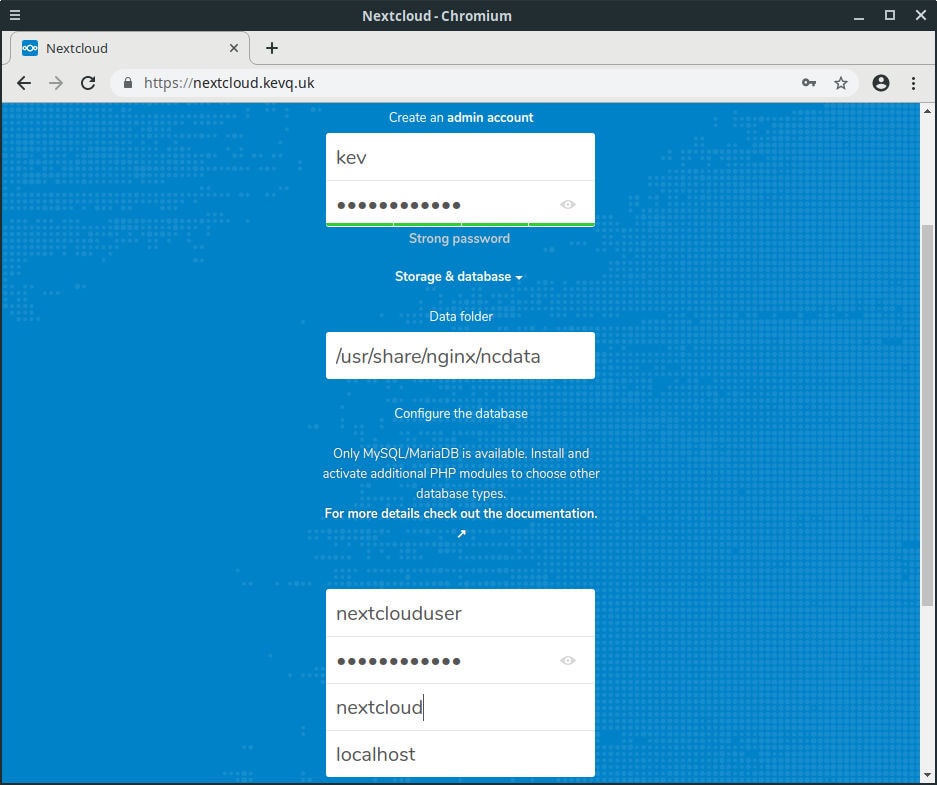
Click next again to configure your admin account, then click on the down arrow next to where it says Storage & Database.
Leave the data folder unchanged, select MySQL/MariaDB and enter the database details you noted down earlier.
Finally, click Finish Setup and after a minute or so, you should be greeted with the files interface for your brand new Nextcloud instance.
If you decide to install Nextcloud on shared hosting, I would strongly recommend enabling Server-Side Encryption. This will protect your data in a shared environment. You can enable it from Settings > Administration > Security.
Conclusion
Congratulations, you just installed Nextcloud on shared hosting; I told you it was easy!
You can now start familiarising yourself with the Nextcloud interface and all it has to offer. You can also expand the functionality of Nextcloud by installing apps.
This guide assumes a certain level of technical ability. If you are not comfortable administering your own server, then I would suggest you pay someone else to host your Nextcloud server. I can personally recommend OwnCube.
As well as some technical knowledge, you will also need access to a LEMP server (Linux, Nginx, MariaDB & PHP). If you don’t have one, I’d recommend this guide by LinuxBabe.
You do NOT need to install the LEMP stack if you intend to use the Nextcloud snap package.
Finally, you will need a domain name, or sub-domain, that has the A record pointing to your Nextcloud server’s public IP.
Snaps – The Simple Method
If you don’t want to install LEMP and Nextcloud manually, you can opt for the simple method, which is the snap package.
The snap package is basically a Nextcloud server all bundled up in a nice little bucket that’s ready to go. However, you may have some issues later on when it comes to backing up your data. This is because snap packages are segregated from the rest of the OS, so your user account will not have access to the Nextcloud data by default.
If you want to get your Nextcloud server up and running quickly, with very little ongoing admin, then the snap package is worth considering. The snap will also update automatically as new versions are released.
You will also need to configure Let’s Encrypt to ensure that your Nextcloud server is using HTTPS, and therefore protecting your credentials (among other things) when logging in.
To install the Nextcloud snap and configure Let’s Encrypt, you will need to run the following commands:
sudo snap install nextcloud

# Enable HTTPS via Let's Encrypt
sudo nextcloud.enable-https lets-encrypt

# Add your domain to the trusted domains
sudo snap run nextcloud.occ config:system:set trusted_domains 1 --value=nextcloud.domain.com

# Restart the snap to apply the changes
sudo snap restart nextcloud
Remember to update nextcloud.domain.com to reflect your own domain.
The snap package is a quick and easy way to getting Nextcloud up and running, but I wanted more control. So let’s take a look at how we install and configure Nextcloud manually.
Nextcloud Server Manual Installation
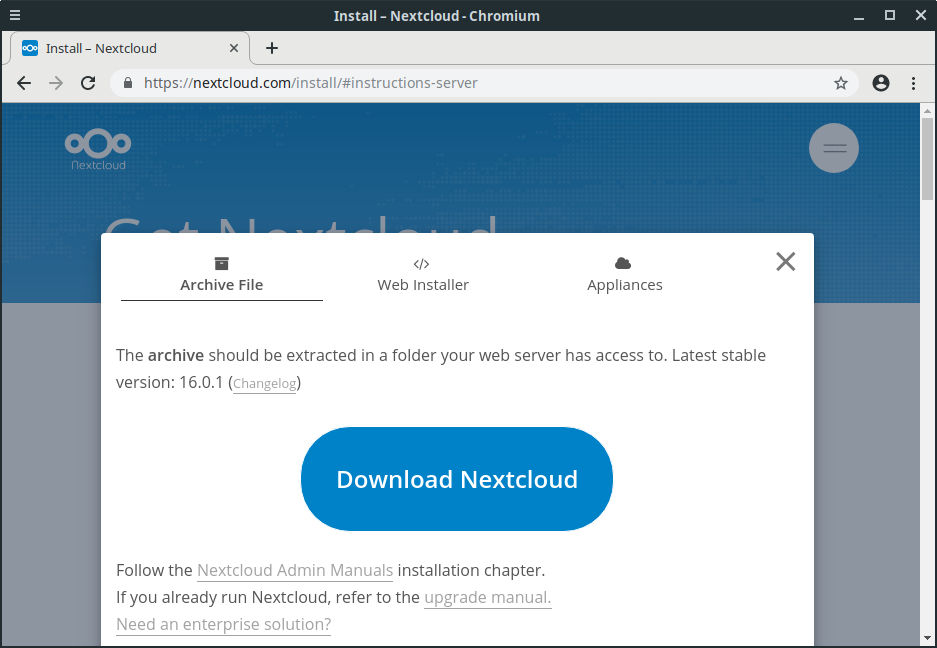
The first thing we need to do is get the download link for the Nextcloud server package. At the time of writing this guide, the latest version of Nextcloud is 16.0.1.
Go to this link, right click on the blue Download button and select Copy link location. Then let’s head to our server and start work:
get https://download.nextcloud.com/server/releases/nextcloud-16.0.1.zip

# Install unzip and extract the Nextcloud package
sudo apt-get install unzip
sudo unzip nextcloud-16.0.1.zip -d /usr/share/nginx/
The Nginx user (www-data) needs to be given ownership of the Nextcloud directory, and everything within it, so Nginx can write to the Nextcloud folder:
Nextcloud requires a database to store administrative data. I personally went with MariaDB, which is a fork of MySQL.
# Connect to MariaDB server
sudo mariadb

# Create a database & user
create database nextcloud;
create user nextclouduser@localhost identified by 'some-password';

# Grant the user all privileges to the Nextcloud database
grant all privileges on nextcloud.* to nextclouduser@localhost identified by 'some-password';

# Flush privileges and exit
flush privileges;
exit;
Configure Nginx
At this point, we have the Nextcloud files copied over and a database ready and waiting. It’s now time to configure Nginx so Nextcloud actually works.
Let’s start by creating a Nextcloud config file, so Nginx knows what to do with requests that are destined for our Nextcloud URL.
sudo nano /etc/nginx/conf.d/nextcloud.conf
Now paste the following into the file, editing the domain name and Nextcloud folder path as needed. If you don’t know how to use Nano, this link might help.
server {
    listen 80;
    server_name nextcloud.domain.com;

# Add security related headers
    add_header X-Content-Type-Options nosniff;
    add_header X-XSS-Protection "1; mode=block";
    add_header X-Robots-Tag none;
    add_header X-Download-Options noopen;
    add_header X-Permitted-Cross-Domain-Policies none;

# Path to your Nextcloud folder - can be optionally changed
    root /usr/share/nginx/nextcloud/;

    location = /robots.txt {
        allow all;
        log_not_found off;
        access_log off;
    }

# Card and Cal DAV redirects
    location = /.well-known/carddav {
        return 301 $scheme://$host/remote.php/dav;
    }
    location = /.well-known/caldav {
       return 301 $scheme://$host/remote.php/dav;
    }

# For Let's Encrypt challenges
    location ~ /.well-known/acme-challenge {
      allow all;
    }

# Disable gzip
    gzip off;

# Specify paths to error pages
    error_page 403 /core/templates/403.php;
    error_page 404 /core/templates/404.php;

# Redirect bare domain to the index.php file
    location / {
       rewrite ^ /index.php$uri;
    }

# Block some stuff because, you know, bad guys
    location ~ ^/(?:build|tests|config|lib|3rdparty|templates|data)/ {
       deny all;
    }
    location ~ ^/(?:\.|autotest|occ|issue|indie|db_|console) {
       deny all;
     }

# Here be FastCGI dragons
    location ~ ^/(?:index|remote|public|cron|core/ajax/update|status|ocs/v[12]|updater/.+|ocs-provider/.+|core/templates/40[34])\.php(?:$|/) {
       include fastcgi_params;
       fastcgi_split_path_info ^(.+\.php)(/.*)$;
       fastcgi_param SCRIPT_FILENAME $document_root$fastcgi_script_name;
       fastcgi_param PATH_INFO $fastcgi_path_info;

# Avoid sending the security headers twice
       fastcgi_param modHeadersAvailable true;
       fastcgi_param front_controller_active true;
       fastcgi_pass unix:/run/php/php7.2-fpm.sock;
       fastcgi_intercept_errors on;
       fastcgi_request_buffering off;
    }

    location ~ ^/(?:updater|ocs-provider)(?:$|/) {
       try_files $uri/ =404;
       index index.php;
    }

# Let's cache all the things
    location ~* \.(?:css|js)$ {
        try_files $uri /index.php$uri$is_args$args;
        add_header Cache-Control "public, max-age=7200";

# More security related headers (these are supposed to be duplicates of the ones above)
        add_header X-Content-Type-Options nosniff;
        add_header X-XSS-Protection "1; mode=block";
        add_header X-Robots-Tag none;
        add_header X-Download-Options noopen;
        add_header X-Permitted-Cross-Domain-Policies none;
# Don't log access to assets (optional)
        access_log off;
   }

   location ~* \.(?:svg|gif|png|html|ttf|woff|ico|jpg|jpeg)$ {
        try_files $uri /index.php$uri$is_args$args;
# Don't log access to assets (optional)
        access_log off;
   }
}
Test the Nginx config to ensure the new config will work as expected. We should see a test is successful message.
sudo nginx -t
nginx: the configuration file /etc/nginx/nginx.conf syntax is ok
nginx: configuration file /etc/nginx/nginx.conf test is successful

# Config is fine, restart Nginx to apply the config
sudo systemctl reload nginx
The final step of the installation process is to install all of the PHP modules we will need for our Nextcloud server:
At this point, everything is installed and we should be able to navigate to our Nextcloud URL:
DO NOT configure anything at this point, as the connection is currently insecure.
Configure Let’s Encrypt
Now we have Nextcloud running, it’s time to secure it with a TLS certificate. We will do this using Let’s Encrypt.
# Install Let's Encrypt certbot and the required Nginx plugin
sudo apt-get install certbot python3-certbot-nginx

# Generate the certificate
sudo certbot --nginx --agree-tos --redirect --hsts --staple-ocsp --email your@email.com -d nextcloud.domain.com
Once the certificate has been generated, you will get a warning that says we were unable to set up enhancement ensure-http-header for your server, however, we successfully installed your certificate.
Don’t worry, this is normal and expected behaviour when installing a Let’s Encrypt certificate with Nginx. Let’s fix that by heading back to our Nginx configuration:
sudo nano /etc/nginx/conf.d/nextcloud.conf
We need to tell Nginx to use the Let’s Encrypt certificates, redirect HTTP requests to HTTPS, and add the HSTS header configuration. So let’s change the Nginx config from this:
server {
    listen 80;
    server_name nextcloud.domain.com;

# Add security related headers
    add_header X-Content-Type-Options nosniff;
    add_header X-XSS-Protection "1; mode=block";
    add_header X-Robots-Tag none;
    add_header X-Download-Options noopen;
    add_header X-Permitted-Cross-Domain-Policies none;

**** REST OF THE CONFIG ****
To this:
server {
    listen 80;
    server_name nextcloud.domain.com;
    return 301 https://nextcloud.domain.com$request_uri;
}

server {
    listen 443 ssl;
    ssl_certificate /etc/letsencrypt/live/nextcloud.domain.com/fullchain.pem;
    ssl_certificate_key /etc/letsencrypt/live/nextcloud.domain.com/privkey.pem;
    include /etc/letsencrypt/options-ssl-nginx.conf;
    ssl_dhparam /etc/letsencrypt/ssl-dhparams.pem;

# Add security related headers
    add_header Strict-Transport-Security "max-age=31536000" always;
    add_header X-Content-Type-Options nosniff;
    add_header X-XSS-Protection "1; mode=block";
    add_header X-Robots-Tag none;
    add_header X-Download-Options noopen;
    add_header X-Permitted-Cross-Domain-Policies none;

**** REST OF THE CONFIG ****
Let’s test the Nginx configuration again and restart Nginx to apply the changes:
sudo nginx -t
nginx: the configuration file /etc/nginx/nginx.conf syntax is ok
nginx: configuration file /etc/nginx/nginx.conf test is successful

sudo systemctl reload nginx
Back to the browser window and hit the refresh button, we should be redirected to HTTPS and see a valid certificate. Life is good!
Setup A Data Folder
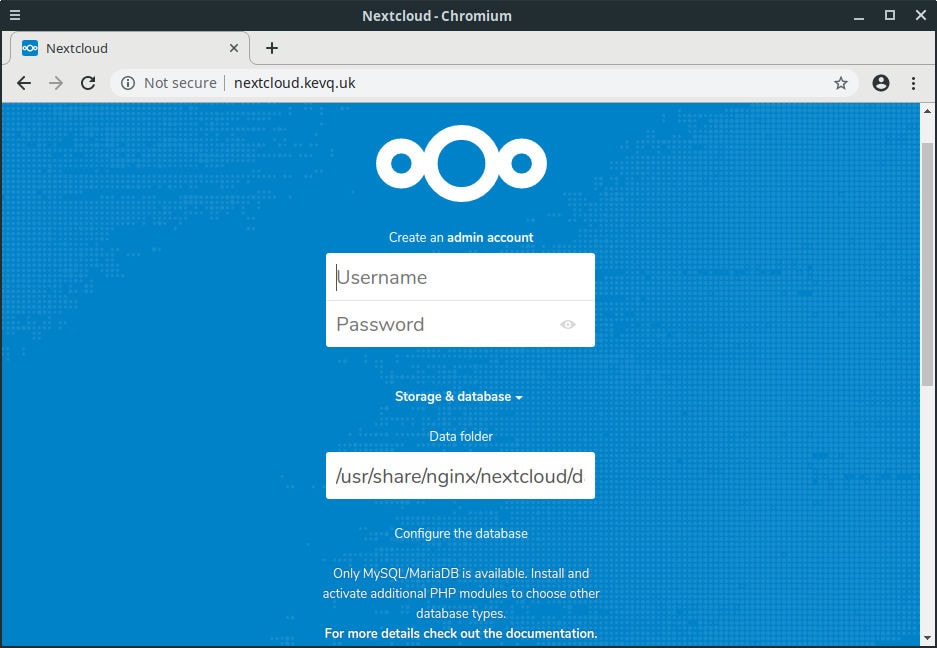
Our Nextcloud server is now more secure, so we can configure the admin account and database. I would recommend changing the Nextcloud data folder, so that our user’s personal data is stored separately from the Nextcloud admin data.
In the example below I called the data folder ncdata, but you can call it whatever you want.
sudo mkdir /usr/share/nginx/ncdata

# Make Nginx user the owner of the folder
sudo chown www-data:www-data /usr/share/nginx/ncdata -R
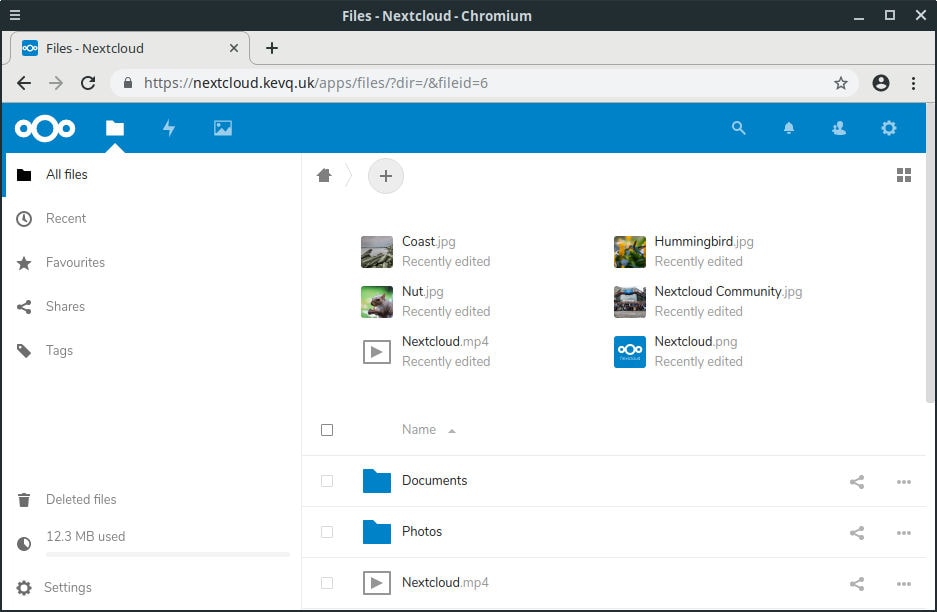
Whichever path you created and specified above, make sure you put that in the data folder field on the Nextcloud setup page. We also need to enter the database name, user and password that we created earlier.
Once we have entered the admin credentials, data folder path and the database details, we hit the finish button, and hey presto! We’re presented with Nextcloud interface complete with files. Life is getting better!
:: medium Congratulations, you have just setup and configured your very own Nextcloud server!
::
Next Steps
You though we were all done? Nope, there’s more for us to do yet, but we’re nearly there. I promise.
Take this opportunity to have a click around and familiarise yourself with Nextcloud. Once you have done that, click on your avatar (top right corner) and select settings.
From the settings screen, go to Administration > Overview from the right-hand pane. In the overview pane there are likely to be a few warnings in orange text. Let’s fix them, shall we?
Warning 1: PHP not setup properly
PHP does not seem to be setup properly to query system environment variables. The test with getenv(“PATH”) only returns an empty response. Please check the installation documentation for PHP configuration notes and the PHP configuration of your server, especially when using php-fpm.
The solution to this is to enable some environment variables within PHP’s www.conf file.
sudo nano /etc/php/7.2/fpm/pool.d/www.conf
Now look for the section of the file shown in the code below and remove the preceding semicolon from all the lines.
The PHP memory limit is below the recommended value of 512MB.
To fix this we need to edit the ‘php.ini' file to increase the maximum amount of memory that the PHP process can consume. While we’re there, we might as well increase the maximum upload limit too.
sudo nano /etc/php/7.2/fpm/php.ini
Now look for the following values within the php.ini file and change them as needed. You can increase the PHP memory limit above 512MB if you wish.
On my production server, I have the PHP memory limit set to 1GB, as my server has 4GB RAM.
# Default is 128M
memory_limit = 512M

# Default is 2M
upload_max_filesize = 100M

# Restart PHP service again
sudo systemctl reload php7.2-fpm.service
Restart PHP again to apply the new settings and head back to the admin overview screen. Hit refresh and hey presto! Two of the warnings are already gone. Life is getting better all the time!
Warning 3: MySQL 4-byte characters
MySQL is used as database but does not support 4-byte characters. To be able to handle 4-byte characters (like emojis) without issues in filenames or comments for example it is recommended to enable the 4-byte support in MySQL. For further details read the documentation page about this.
The final error that we need to resolve is to enable 4-byte character support. We can do this by using Nextcloud’s command line utility, occ. Run the commands below to enable 4-byte support.
Refresh the admin overview screen again and we see that all the warnings are cleared. There may be other warnings about caching and referrer policies, but these are nothing to worry about really.
You can configure memcache on your Nextcloud server if you wish, but it’s really not required if your Nextcloud server is designed for personal/family use.
If you notice poor server performance, then you can read about how to enable caching, among other things, in the Nextcloud documentation.
Security
Security is hugely important (duh!), especially since your Nextcloud server is likely to be available on the Internet. Luckily, Nextcloud have provided a scan utility that will check our Nextcloud server and provide a security rating.
The scoring is graded as follows:
E = This server is vulnerable to at least one vulnerability rated “high”. It is likely quite easy to break in and steal data or even take over the server.
D = This server is vulnerable to at least one vulnerability rated “medium”. With bit of effort, like creating a specially crafted URL and luring a user there, an attacker can likely steal data or even take over the server.
C = This server is vulnerable to at least one vulnerability rated “low”. This might or might not provide a way in for an attacker and will likely need some additional vulnerabilities to be exploited.
A = This server has no known vulnerabilities but there are additional hardening capabilities available in newer versions making it harder for an attacker to exploit unknown vulnerabilities to break in.
A+ = This server is up to date, well configured and has industry leading hardening features applied, making it harder for an attacker to exploit unknown vulnerabilities to break in.
As you can see, our server gets an A+, so we know we’re pretty secure. Life is really good!
That’s It
If you have made it this far you should now have a secure and private Nextcloud server. Congratulations, you no longer need to rely on services like Dropbox, Google or Microsoft.
From here, I would suggest taking a look at the many apps that Nextcloud has to offer. You can do some awesome stuff like:
Add contacts, calendar and mail
Add a password manager
Sync your bookmarks
Sync your phone’s data (Android & iOS)
Add an RSS reader
And many, many more
I hope this Nextcloud server setup guide was helpful. Who knows, maybe you will be able to start taking control of your privacy and startde-Googling, just like I did.
Your first reaction is to update your résumé and apply to every job that seems a halfway-decent fit. This is normal and natural. You need a measure of control in what is otherwise the chaos of unemployment.
However blindly sending applications - spray and pray - does not work.
You need to follow a structured approach that emphasizes both self-assessment and strategic engagement to find a new job fast, that also satisfies you. Each step aids in clarifying your own goals, making you a better candidate for future employers.
Invest in a Career Pivot Profile Clinic
You should follow the 7 steps below to improve your job search process. However, not everyone wants to do this process alone or you may need help and motivation to move along this path.
In today’s digital age, data has
become one of the most important assets for businesses and individuals alike.
From confidential documents to cherished memories, data is crucial for both
personal and professional reasons. However, data loss can occur due to various
reasons. This included hardware failure, natural disasters, or cyber-attacks.
All of this can lead to irreversible consequences. Hence, it is essential to
have a backup strategy in place to protect and recover valuable data in case of
any unforeseen circumstances. In this article, we will discuss the importance
of data backup and provide some useful tips and strategies to help you avoid
data loss and keep your data safe and secure