Pages

Showing posts with label Hosting. Show all posts

Avoiding Data Loss: Backup Strategies

In today’s digital age, data has become one of the most important assets for businesses and individuals alike. From confidential documents to cherished memories, data is crucial for both personal and professional reasons. However, data loss can occur due to various reasons. This included hardware failure, natural disasters, or cyber-attacks. All of this can lead to irreversible consequences. Hence, it is essential to have a backup strategy in place to protect and recover valuable data in case of any unforeseen circumstances. In this article, we will discuss the importance of data backup and provide some useful tips and strategies to help you avoid data loss and keep your data safe and secure


What is an Internet exchange point?

 An Internet exchange point (IXP) is a physical location through which Internet infrastructure companies such as Internet Service Providers (ISPs) and CDNs connect with each other. These locations exist on the “edge” of different networks, and allow network providers to share transit outside their own network. By having a presence inside of an IXP location, companies are able to shorten their path to the transit coming from other participating networks, thereby reducing latency, improving round-trip time, and potentially reducing costs.

How does an Internet exchange point work?

At its core, an IXP is essentially one or more physical locations containing network switches that route traffic between the different members networks. Via various methods, these networks share the costs of maintaining the physical infrastructure and associated services. Similar to how costs are accrued when shipping cargo through third-party locations such as via the Panama Canal, when traffic is transferred across different networks, sometimes those networks charge money for the delivery. To avoid these costs and other drawbacks associated with sending their traffic across a third-party network, member companies connect with each other via IXP to cut down on costs and reduce latency.

5 Most Popular Web Hosting Control Panels


5 Most Popular Web Hosting Control Panels (Head image)

In the not-always-simple realm of web hosting, control panels are meant to simplify the user experience for website owners and administrators alike. These interfaces serve as command centers, streamlining the management of various hosting aspects, from domains to databases. In this big comparison guide we will compare the 5 Most Popular Web Hosting Control Panels for you.

Brief Overview of Web Hosting Control Panels

Before delving into the specifics, let’s grasp the essence of web hosting control panels. These platforms, often web-based, act as intermediaries between users and servers, offering a visual interface to execute commands and configure settings. Think of them as the cockpit of your hosting journey, from where you can navigate the complexities of server management. 

Importance of Choosing the Right Control Panel

Choosing the right control panel is comparable to selecting the perfect tool for a job, with a profound impact on the ease of task execution, overall performance, and security of your digital domain. The choice influences the hosting landscape, creating a ripple effect that extends beyond task execution to shape the holistic success of your online presence. 

As we embark on an exploration of the five most popular web hosting control panels, our focus goes beyond the bells and whistles. We aim to provide insights into the nuances of each, empowering you to make an informed decision based on your unique hosting requirements. Join us on this journey through the digital cockpit, where we decipher the language of control panels and expose the possibilities they offer. 

How to Back Up WordPress using UpdraftPlus

In the dynamic world of website management, safeguarding your WordPress site is paramount. UpdraftPlus emerges as a reliable and efficient solution for such needs. As a WordPress plugin specifically designed for backup and migration, UpdraftPlus stands out with its user-friendly interface and robust functionality. Whether you are a beginner or an experienced webmaster, this plugin ensures your website’s data is securely backed up and easily restorable. This article will guide you through the process of using UpdraftPlus to back up your WordPress site, ensuring that your digital content remains safe and accessible. Features and Capabilities of UpdraftPlus UpdraftPlus offers both free and paid plans, allowing users to choose the level of features and support that best fits their needs. The free version provides essential backup capabilities, while the paid plans offer advanced features and priority support. Your choice between the free and paid plans depends on your specific requirements and budget. 

DomainKeys and DKIM in Plesk and cPanel


DomainKeys and DKIM can help you to increase the reputation of your e-mail server and preventing others to manipulate or fake your e-mails. In this tutorial, we want to show you how you can activate this feature in cPanel and Plesk. Firstly, we have to clarify that Plesk allows you to activate DomainKeys in the web interface and that cPanel is using the newer version called DKIM. Those are both quite similar in many points, but we will use those terms separately. All the images in this tutorial can be shown in a bigger version with all the details, by clicking on them. We will often use the example domain “yourdomain.com”. It has to replaced with your own one, whenever it appears.

Ultimate Guide to SSL

Ultimate Guide to SSL (head image)

Introduction

In the rapidly evolving digital landscape, the need for secure and private communication on the internet has become more crucial than ever. This is where SSL (short for: Secure Sockets Layer) comes into play. SSL is a fundamental technology that ensures encrypted connections between web servers and browsers. This is archived by safeguarding sensitive information like passwords and protecting users from cyber threats. In this comprehensive guide, we will explore the world of SSL, its historical context, and its significance in modern web usage. 

 SSL, first introduced by Netscape in 1994, revolutionized the way data is transmitted over the internet. It provided a secure layer of encryption, making it increasingly difficult for attackers to intercept and decipher sensitive information exchanged between users and websites. Over the years, SSL has evolved into Transport Layer Security (TLS), encompassing newer versions and stronger cryptographic algorithms to enhance security. 

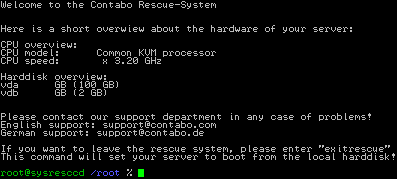
System Rescue CD: First Steps

 sysresccd login

Many of you have already heard about it or even used it once in a while, but most of you have probably not been introduced to it yet: Our rescue system! While hopefully not being needed at all, it provides many possibilities to fix certain problems and to bring the machine back online as soon as possible. When the server is down, every second counts. It is important to know what to do beforehand. Thus, I will provide you with some basic information first:

SRV Records – How do I use them correctly?


Definition of an SRV record

With a Service Resource Record (short: SRV record) you can make services, which are usually available via an IP:PORT combination, reachable using a DNS host name. Important to note regarding SRV record is the fact, that they only work if an application has been specifically programmed to make use of them. Examples for this are TeamSpeak3 or Minecraft. SRV-Records can not be used to point a DNS name to an IP address/port combination for arbitrary use by any application.

Example – Teamspeak:
Usually TeamSpeak is using the protocol UDP over port 9987. If you are running a TeamSpeak instance with the IP 123.124.125.126 every client that wants to connect has to enter the IP:port combination of 123.124.125.126:9987. If you change the port or the server IP, you have to inform everyone about the new combination. With SRV records it is possible to connect to TeamSpeak using a DNS host name like ts.mydomain.com

How to Configure Cloudflare in front of Your Website or Application


How to Configure Cloudflare (head image)

Cloudflare is a content delivery network (CDN) that provides a range of services, including DDoS protection, caching, and website optimization. By configuring Cloudflare in front of your website or application, you can take advantage of these services to improve the performance and security of your site. However, setting up Cloudflare can be a daunting task for those who are unfamiliar with the process. In this article, we will provide a step-by-step guide on how to configure Cloudflare in front of your website or application, so you can start enjoying the benefits of this powerful CDN. Whether you’re a seasoned developer or a beginner, this guide will help you get up and running with Cloudflare in no time. 

Create a Cloudflare Account

The first step in configuring Cloudflare for your website or application is to create an account. Go to the Cloudflare website and click on the “Sign Up” button. You will be prompted to enter your email address and create a password. Now check your email inbox to verify your email address. Once you have completed this step, you will be directed to the Cloudflare dashboard which looks like this: 

Add Your Website to Cloudflare

The next step is to add your website to Cloudflare. To do this, click on the “Add Site” button and enter your website URL: 

Cloudflare will then scan your website to determine its DNS records.  

Choose a Cloudflare Plan

Cloudflare offers a range of plans, from a free plan to more advanced plans that offer additional features. Choose the plan that best suits your needs and click on the “Continue” button. 

In this example we will choose the “Free”-Tier. 

Update Your DNS Settings

Once this is done, Cloudflare will display a list of DNS records for your website. If there are already some entries, verify that these records are correct or delete them and then click on the “Continue” button. 

Now Cloudflare will display new nameservers that you need to update on your domain registrar’s website. This is usually where you purchased your domain name. For Contabo customers this can be done via the Customer Control Panel (CCP) at my.contabo.com. Your DNS settings can be updated under “DNS Zone Management”. If you want to learn more about DNS Zone Management, check out this article. If you are with some other provider, you will need to log in to your domain registrar’s website and update the nameserver records with the ones provided by Cloudflare.


Verify Your DNS Settings

Once you have updated your DNS settings, go back to the Cloudflare dashboard and click on the “Done, Check Nameservers” button. Cloudflare will then verify that your DNS settings have been updated correctly. This may take some time, so be patient. Cloudflare will send you an email if these DNS settings have been updated. 

Connect your Server with your Domain on Cloudflare

After your DNS settings have been updated, it’s time to connect your server with the Domain you set up at Cloudflare. To do so choose “Websites” in the left menu: 

Now click on your Domain: 

And select “DNS” in the left menu: 

To connect your server with this domain, click on “Add record”: 

  1. Now leave the “Type” on “A”. 
  1. For “Name” enter your Domain (e.g. test.com) 
  1. For IPv4 address enter the IPv4 Address of the server you want to connect with your domain (In Contabo this can be found in the Customer Control Panel –> Your Services) 
  1. Now click on “Save” 

In our example it looks like this: 

Now it will again take some time to update your DNS settings. Again: It can take up to 24 hours but will usually be done in a few minutes. 

Enjoy the Benefits of Cloudflare

Congratulations! You have successfully configured Cloudflare in front of your website or application. Cloudflare will now provide a range of services to help improve the performance and security of your site, including DDoS protection, caching, and website optimization. 

 Source: https://contabo.com/blog/how-to-configure-cloudflare/?fbclid=IwAR1lMyG8XV3WDRFGx1yIWAcs5D_Hf_VZYKxyoaMQbT1F0o4bENsresttkC4

Welcome to the cPanel ELevate Project

 Goal

The cPanel ELevate Project provides a script to upgrade an existing cPanel & WHM CentOS 7 server installation to AlmaLinux 8 or Rocky Linux 8.

Disclaimer

We do not guarantee the functionality of software in this repository. We provide it on an experimental basis only. You assume all risk for use of any software that you install from this experimental repository. Installation of this software could cause significant functionality failures, even for experienced administrators.

cPanel Technical Support is limited in their ability to support experimental software. You should instead utilize the Github Issues page

Introduction

This project builds on the Alma Linux ELevate project, which leans heavily on the LEAPP Project created for in-place upgrades of RedHat-based systems.

The Alma Linux ELevate project is very effective at upgrading the distro packages from CentOS 7 to AlmaLinux 8 or Rocky Linux 8. However if you attempt use it directly on a CentOS 7-based cPanel install, you will end up with a broken system.

This project was designed to be a wrapper around the Alma Linux ELevate project to allow you to successfully upgrade a cPanel install with an aim to minimize outages.

Containers vs Virtual Machines (Cloud Explained Series)


Both virtual machines and containers are routinely used for handling cloud workloads. Our previous article described how virtual machines work, today we’re going to focus on their lightweight relative – containers. But before we start with containers, let’s quickly sum up the previous article:

How to Use Plesk for Backups

Backing up your crucial data is one of the most important things to keep in mind when operating your own server (no matter if it is a VPS or a Dedicated Server). Several tools and approaches are available for that. 

Contabo offers S3-compatible Object Storage which can be used for backups of your data. Your files are stored in our Data Center with three redundancy disks in Ceph. That means three drives can fail at the same time without affecting data. 

In the following article, we explain how you can use the Plesk Backup Manager with our S3-compatible Object Storage to back up your server running Plesk.

Preparing your Object Storage

Before setting up a backup for your Plesk instance, we need to prepare our Object Storage first. To do so login to the Object Storage dashboard here

After successfully login in, click on Create Bucket to create a Bucket, in which you backups will be saved. It makes sense to give it a fitting name e.g. the servers name or the IP address of the belonging server so you won’t lose track of different backups in your Object Storage. If you want, you can even create some subfolders in this bucket but this is optional.

Changing the Partition Layout of Your VPS after OS Installation


What are Partitions?

Imagine a laptop with a 500 GB disk and Windows as the operating system. By default, Windows is installed on the 500 GB disk. But what if you want to have both Windows and Linux? That’s where partitions come in. For example, you can create a 400 GB partition and a 100 GB partition on your 500 GB disk. Now your physical disk acts like two separate disks which means you can install Windows on one partition and Linux on the other.

In other words, partitions are logically separated parts on a hard drive that are treated as if they were separate hard drives. That means, each partition can have its own file system on it and they can also be encrypted.

Setting Up WordPress with Cloud-Init


WordPress is the most used open-source content management system – and it’s totally free. More than 40% of the websites on the internet are powered by WordPress*, both small blogs and large websites. WordPress is extremely customizable and beginner-friendly, but is also suitable for large and complex websites.

Automate the Setup Process with Cloud-Init

Setting up new WordPress instances is easy, but in order for WordPress to run you need a webserver and a MySQL database. Setting all of this up can take a lot of time, especially if you’re doing it on a large scale.

However, if you want to add WordPress to your existing server, head over to this guide on setting up WordPress manually.

Cloud-Init can be used to automate the installation and setup process of your server by following a specific set of instructions you define. So in this guide, we will take a look at how the installation process looks and create a Cloud-Init config for it, so it can be automated.

Benefits of using Cloud-Init

The true power of Cloud-Init is not only automating the initial installation, but replicating it on multiple machines – automatically. This is a huge time-saver in case of a disaster, where you need a new server running and configured as fast as possible. For more details about Cloud-Init itself, we’ve written a whole article about the benefits and how to use it.

How to Remove the Powered By Text in WordPress Theme Footer

In this article, we are going to cover how to remove the powered by text in WordPress. Or simply say how to change to footer text in WordPress.

There can be two cases, first in case you are using the Themes of AcmeThemes and for ordinary WordPress themes. We are going to cover for both cases.

change footer text in wordpress

Case 1 – If you are using themes by Acme Theme

All of our themes have Proudly powered by WordPress | Theme: AcmeBlog by AcmeThemes. The text is written in the footer section. If you want to remove this you have a different approach to this.
In the case of Premium Theme,
If you are using the premium version(paid version), you have options to hide such a section on Appearance > Customize > Footer Options > Enable/Disable Enable Theme Name and Powered by Text. Checked to show and unchecked to hide the powered by text on the footer.

In the case of Free Themes,
We have a variety of WordPress theme which are free and if you want to hide the Powered by text, you can either customize the theme or need to use the custom CSS codes
1. If you are familiar with WordPress codes, you can customize the theme. Please find the codes inside `acmethemes/hooks/footer.php` file and customize it as you need.

or,

2. Use the below CSS codes on Appearance > Customize > Additional CSS to hide that text.

.site-info {

display: none;

}

How to Run a Bitwarden Server on a VPS


In today’s digital age, passwords are more prevalent than ever. Many of us use social media, online banking and much more. All these accesses are secured with passwords, among other things. Ideally, you should use a different password for each platform, which is also long and contains special characters and numbers. With all these passwords, it is easy to lose track of them. This is where password managers come into play.

Bitwarden is a popular password manager, which is open source. There is a free as well as a paid version hosted by the company behind Bitwarden, or you can host a Bitwarden instance yourself. We will show you how to do that today.  

There are two ways to install a Bitwarden instance. If you plan to run only Bitwarden on a given virtual machine you should pick Bitwarden standalone variant. If you also want to use the server for a different purpose you need to use a “modified” Rust-written variant of Bitwarden. You can read more about “Vaultwarden” here.

Table of Contents

Top 5 SEO Tools For Websites


Here's a snapshot of everyday life in 2022 summed up in a single SEO statistic. When ten people search Google on their smartphone, six of those people will go on to contact that business directly.

What does this mean for you? It means SEO is no longer a nice-to-have. It's a business necessity.

SEO investment starts with having the right tools and software to keep your business rankings where they should be. So we've put together this guide to the top five SEO tools for websites you need to know about in 2022.

1. Ahrefs

Ahrefs is a fantastic all-rounder for SEO research and one of the most popular tools on the market. The tool's core features include:

  • An SEO performance dashboard
  • Competitor research
  • Keyword rankings tool and tracker
  • Keyword research tool
  • SEO site audit tool
  • Content ideas tool

Ahrefs starts from $99 a month, but for more extensive enterprise packages (suitable for SEO agencies with numerous clients), you'll pay $999 a month.

Tools like Ahrefs are a helpful way to boost your site's domain authority. What is domain authority? Head to that link to find out more.

How to upgrade XAMPP in Windows? Complete Solution


I had to write this article cause I couldn’t find any complete solution to help people out with updating XAMPP in Windows. Well, finally here is an easy to understand, step by step guide to upgrade XAMPP that actually works. Kudos!

SOME MAJOR CHANGES!

If you are updating XAMPP after a long time like me than be ready for some major changes. XAMPP no longer comes with the MySQL server. Since XAMPP 5.5.30 and 5.6.14, XAMPP ships MariaDB instead of MySQL. So copy pasting the mysql data files from old to new xampp won’t work anymore!

Connect to remote VPS on Linux


Introduction

One of Linux's most appealing features is the ability to skillfully use a computer with nothing but commands entered into the keyboard—and better yet, to be able to do that on computers anywhere in the world. Thanks to OpenSSH, POSIX users can open a secure shell on any computer they have permission to access and use it from a remote location. It's a daily task for many Linux users, but it can be confusing for someone who has yet to try it. This article explains how to configure two computers for secure shell (SSH) connections, and how to securely connect from one to the other without a password.

Terminology:

When discussing more than one computer, it can be confusing to identify one from the other. The IT community has well-established terms to help clarify descriptions of the process of networking computers together.