Pages

Showing posts with label Domain. Show all posts

SRV Records – How do I use them correctly?


Definition of an SRV record

With a Service Resource Record (short: SRV record) you can make services, which are usually available via an IP:PORT combination, reachable using a DNS host name. Important to note regarding SRV record is the fact, that they only work if an application has been specifically programmed to make use of them. Examples for this are TeamSpeak3 or Minecraft. SRV-Records can not be used to point a DNS name to an IP address/port combination for arbitrary use by any application.

Example – Teamspeak:
Usually TeamSpeak is using the protocol UDP over port 9987. If you are running a TeamSpeak instance with the IP 123.124.125.126 every client that wants to connect has to enter the IP:port combination of 123.124.125.126:9987. If you change the port or the server IP, you have to inform everyone about the new combination. With SRV records it is possible to connect to TeamSpeak using a DNS host name like ts.mydomain.com

How to Configure Cloudflare in front of Your Website or Application


How to Configure Cloudflare (head image)

Cloudflare is a content delivery network (CDN) that provides a range of services, including DDoS protection, caching, and website optimization. By configuring Cloudflare in front of your website or application, you can take advantage of these services to improve the performance and security of your site. However, setting up Cloudflare can be a daunting task for those who are unfamiliar with the process. In this article, we will provide a step-by-step guide on how to configure Cloudflare in front of your website or application, so you can start enjoying the benefits of this powerful CDN. Whether you’re a seasoned developer or a beginner, this guide will help you get up and running with Cloudflare in no time. 

Create a Cloudflare Account

The first step in configuring Cloudflare for your website or application is to create an account. Go to the Cloudflare website and click on the “Sign Up” button. You will be prompted to enter your email address and create a password. Now check your email inbox to verify your email address. Once you have completed this step, you will be directed to the Cloudflare dashboard which looks like this: 

Add Your Website to Cloudflare

The next step is to add your website to Cloudflare. To do this, click on the “Add Site” button and enter your website URL: 

Cloudflare will then scan your website to determine its DNS records.  

Choose a Cloudflare Plan

Cloudflare offers a range of plans, from a free plan to more advanced plans that offer additional features. Choose the plan that best suits your needs and click on the “Continue” button. 

In this example we will choose the “Free”-Tier. 

Update Your DNS Settings

Once this is done, Cloudflare will display a list of DNS records for your website. If there are already some entries, verify that these records are correct or delete them and then click on the “Continue” button. 

Now Cloudflare will display new nameservers that you need to update on your domain registrar’s website. This is usually where you purchased your domain name. For Contabo customers this can be done via the Customer Control Panel (CCP) at my.contabo.com. Your DNS settings can be updated under “DNS Zone Management”. If you want to learn more about DNS Zone Management, check out this article. If you are with some other provider, you will need to log in to your domain registrar’s website and update the nameserver records with the ones provided by Cloudflare.


Verify Your DNS Settings

Once you have updated your DNS settings, go back to the Cloudflare dashboard and click on the “Done, Check Nameservers” button. Cloudflare will then verify that your DNS settings have been updated correctly. This may take some time, so be patient. Cloudflare will send you an email if these DNS settings have been updated. 

Connect your Server with your Domain on Cloudflare

After your DNS settings have been updated, it’s time to connect your server with the Domain you set up at Cloudflare. To do so choose “Websites” in the left menu: 

Now click on your Domain: 

And select “DNS” in the left menu: 

To connect your server with this domain, click on “Add record”: 

  1. Now leave the “Type” on “A”. 
  1. For “Name” enter your Domain (e.g. test.com) 
  1. For IPv4 address enter the IPv4 Address of the server you want to connect with your domain (In Contabo this can be found in the Customer Control Panel –> Your Services) 
  1. Now click on “Save” 

In our example it looks like this: 

Now it will again take some time to update your DNS settings. Again: It can take up to 24 hours but will usually be done in a few minutes. 

Enjoy the Benefits of Cloudflare

Congratulations! You have successfully configured Cloudflare in front of your website or application. Cloudflare will now provide a range of services to help improve the performance and security of your site, including DDoS protection, caching, and website optimization. 

 Source: https://contabo.com/blog/how-to-configure-cloudflare/?fbclid=IwAR1lMyG8XV3WDRFGx1yIWAcs5D_Hf_VZYKxyoaMQbT1F0o4bENsresttkC4

What is DNS Propagation?

If you have a new domain name, you must change the name servers to point to HostGator. This article will provide you some background information on DNS and what to expect when changing your name servers.


What is Propagation, and How Long Does it Take?

Propagation is the projected length of time it takes a domain's DNS (Domain Name System) information to be updated across the entire web after a change is made. The process can take 24-48 hours to complete in full. Because of propagation, not all visitors will be directed to your new name servers on your new hosting account; some visitors will continue to be directed to your old name servers on your old hosting account until propagation is complete.

How quickly visitors are directed to the new name servers depends on their physical location, internet service provider, and luck; it is not something HostGator has control over. Once propagation is complete, your site will appear on our server, and your email will be fully functional.

There is no definitive way to tell when propagation is complete. During the first 48 hours, even if you can see your site on the new server, your next-door neighbor might still be seeing the site on the old server. This depends on three factors: your ISP, geographical location, and TTL. There are also ways for you to see the propagation progress using the websites below. These will show your website’s possible visibility. There are also ways for you to see the propagation progress using the websites below.

DNS Propagation – Explained

This guide will help you to get the general information about DNS propagation and provide you with the answers to the following questions:

1. What is DNS propagation?
2. Why does it take up to 72 hours?
3. What are the ways to pass DNS propagation?
4. How to check if DNS propagation has completed for you?

1. What is DNS propagation?

When you update the nameservers for a domain, it may take up to 24-48 hours for the change to take effect. This period is called DNS propagation.

In other words, it is a period of time ISP (Internet service provider) nodes across the world take to update their caches with the new DNS information of your domain.

Due to DNS caches of different levels, after the nameservers change, some of your visitors might still be directed to your old server for some time, whereas others can see the website from the new server shortly after the change.

2. Why does it take up to 72 hours?

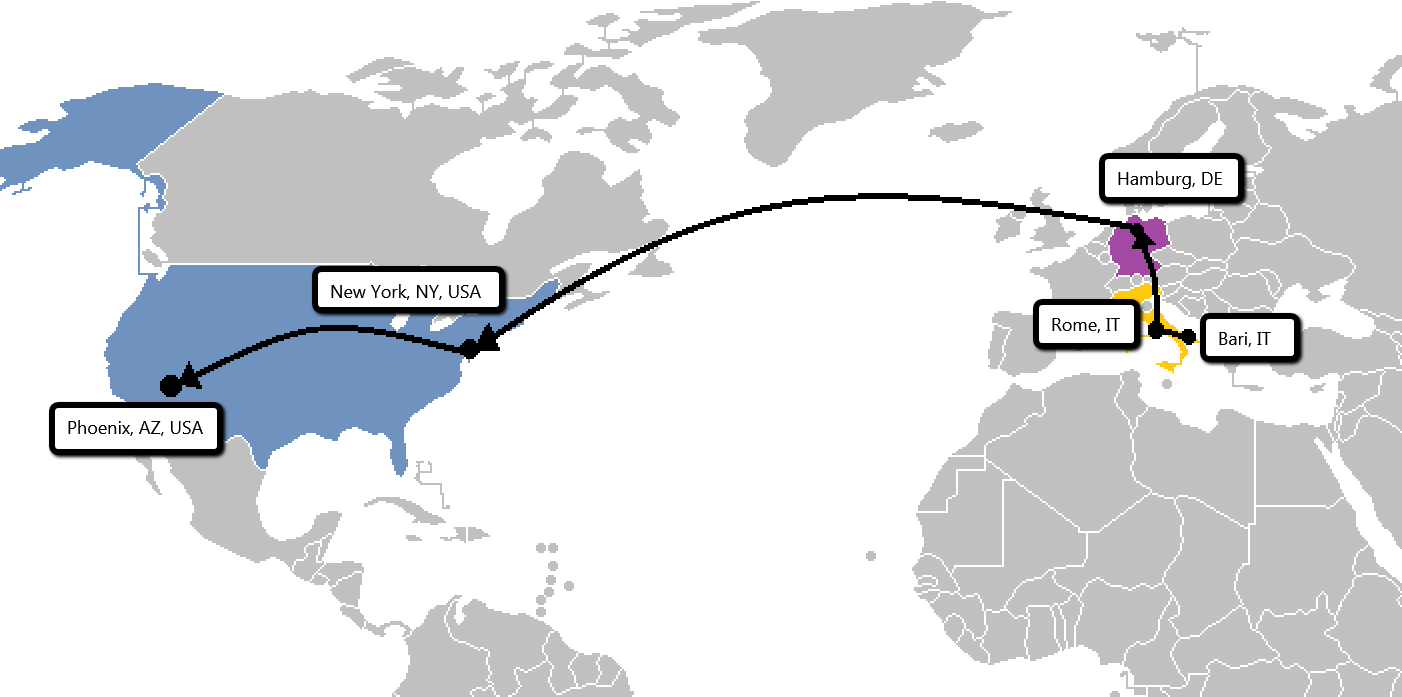
Let’s imagine you live in Bari, Italy, and you just have changed the nameservers for your domain that is hosted in Phoenix, USA.

When you open your domain in a web browser, your request is not going to the hosting server directly, it has to pass through several ISP nodes first. So your computer starts by checking local DNS cache, then the request is sent to your local Bari ISP. From there, the request goes to the upstream provider in Rome, Italy, then connects to the ISP in Hamburg, Germany. After that, the request is sent to the first receiving point in the USA – New York, NY and ultimately, to the ISP in Phoenix, AZ. Here is an example of the request trace – the number of ISP nodes and their location will vary in each particular case:


Each of the ISP nodes checks its own cache to see if it contains the DNS information of the domain. If it is not there, it looks it up and saves it in order to speed up the loading next time and to reduce the traffic.

That is why the new nameservers will not propagate immediately – ISPs have different cache refreshing intervals, so some of them will still have the old DNS information in the memory.

NOTE: to make sure it is not your computer cache that has the outdated information, we recommend clearing the cache of your browser and flushing the DNS cache after the DNS change.


3. What are the ways to pass DNS propagation?

There are three basic methods that will allow you to pass the DNS propagation.
 
If you HAVE NOT changed the nameservers and do not wish them to propagate for so long, there is a way to reduce the propagation time. You need to do two simple things:

1. Point your domain to the destination IP address by means of A record on the side of the current DNS provider, setting the minimal TTL ('Time to live' – propagation time) for this record, for instance, to 300 seconds (5 minutes).

2. Once A record has been updated, wait up to 30 minutes and change the nameservers for your domain.

As a result, your domain will be resolved to your previous host from the places where the propagation has not been completed yet and to a new one – from the places where it has already passed. In such a way, you may avoid a downtime as both hosts will show you the same result – your new website.


If you HAVE already changed the nameservers, Google public DNS tools may help you to see your website online. Here are the steps to be followed:

1. Set Google Public DNS servers following these instructions.
2. Once done, clear your browser's cache following the steps in this guide and flush your local DNS cache.
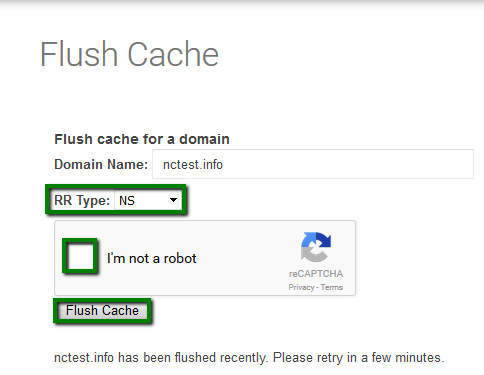
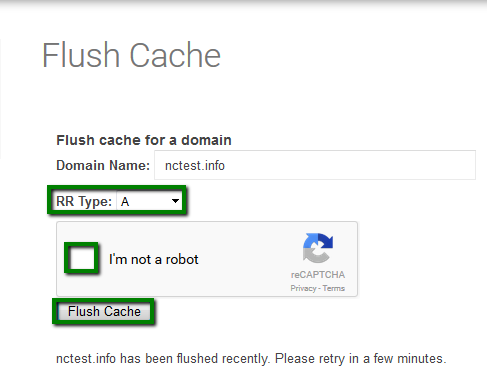
3. In addition, you can use Google Flush Cache tool and flush NS and A record for your domain name:


If you still get an outdated information on your website, you may edit the 'hosts' file on your computer, which will force the domain to resolve to the new IP address. Once the records are added, you will be able to check your website by typing its name in the browser. The major disadvantage of this method is that only you will be able to work on your website in the new location, other users might still see and use your website working from the old server.

NOTE: make sure to remove the entries added to 'hosts' file 48 hours later when the nameservers are fully propagated.

It is also possible to check your website content during the DNS propagation with the help of proxy services (for instance, this one) that will allow you to access websites anonymously.


4. How to check if DNS propagation has completed for you?

There is no definitive way to tell when propagation is complete for you as it depends on three factors: TTL, your ISP and geographical location. However, you may use online DNS checkers in order to track if the DNS record information propagated against multiple nameservers located in different parts of the world.

DNS Checker provides a free DNS lookup service for checking domain DNS records against a randomly selected list of DNS servers in different corners of the world. As a result, you will get DNS data collected from all locations confirming whether a website is completely propagated worldwide or not.

Here is the list of the most popular DNS checkers:

App Synthetic Monitor
G Suite Toolbox

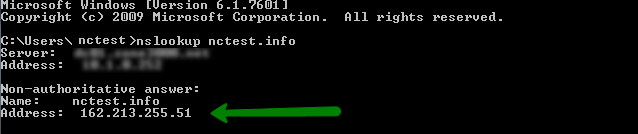
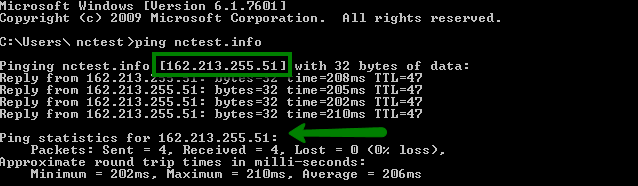
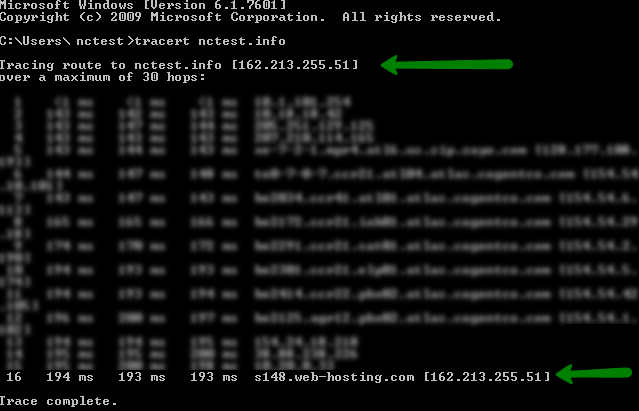
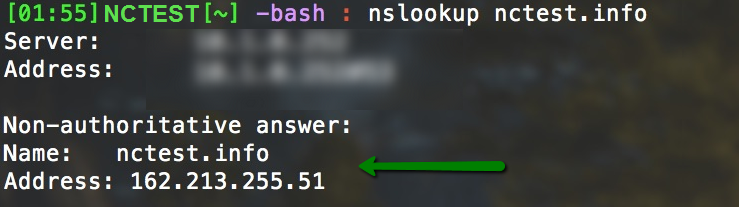
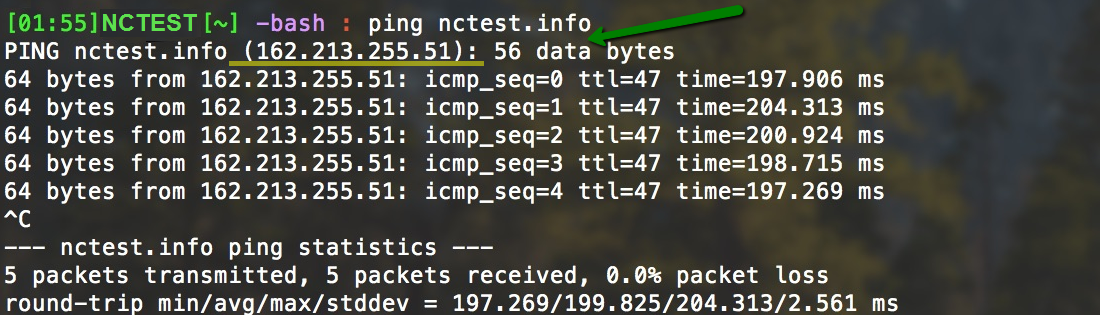
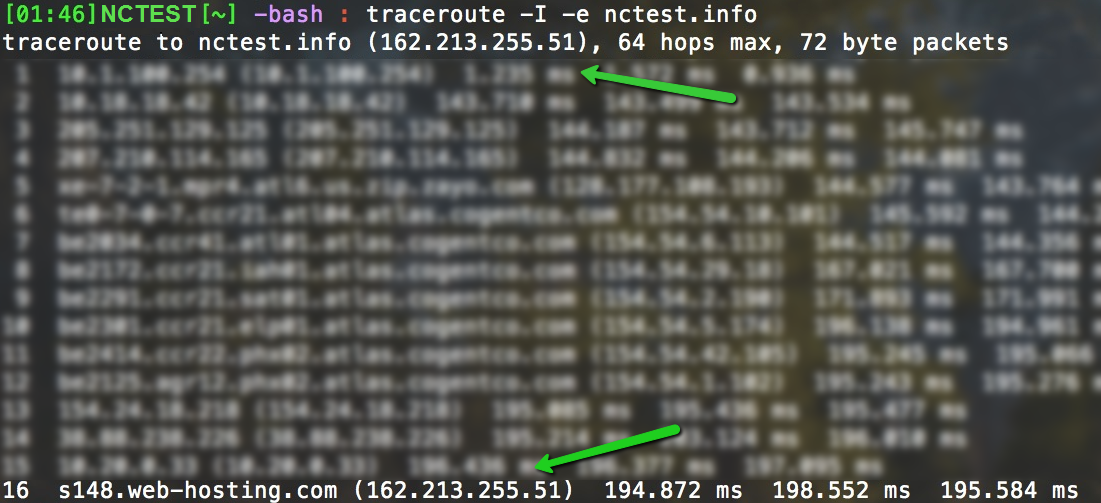
There is another way to check if the DNS propagation is completed for you. You need to run one of the following commands from your PC, laptop or other device:

 nslookup
 traceroute
 ping

What we need to know from the results is the IP address your domain is resolved to. If it's the IP address of the new server, probably, the DNS propagation is complete for you. If the IP address belongs to the old server, you need to wait for the DNS propagation to complete.

Below you can find the examples how to find this IP address.


If you are a Windows OS user, follow these steps:

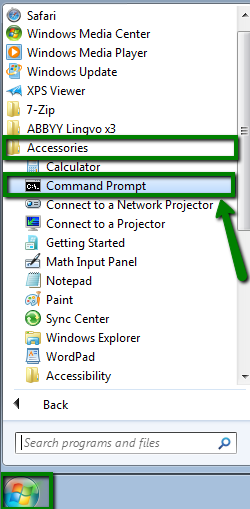
1. Click on the Start button.
2. Click All Programs > Accessories > right-click on Command Prompt and choose Run as Administrator:


3. In the window that opens, type one of the following commands and hit Enter:

nslookup yourdomain.com


ping yourdomain.com


tracert yourdomain.com


NOTE: yourdomain.com should be replaced with your actual domain name in question.


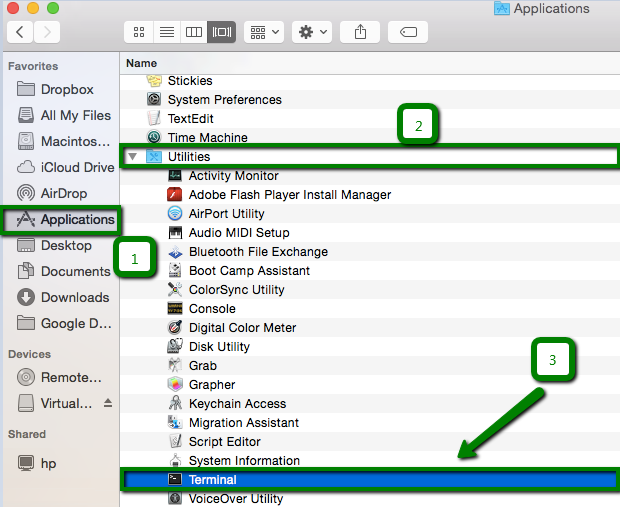
If you are a Mac OS user:

1. Open the Applications folder and click to open the Utilities folder.
2. Find Terminal.app and open it:


3. Type one of the following commands:

nslookup yourdomain.com


ping yourdomain.com


traceroute -I -e yourdomain.com


NOTE: yourdomain.com should be replaced with your actual domain name.

How to run Auto-SSL manually

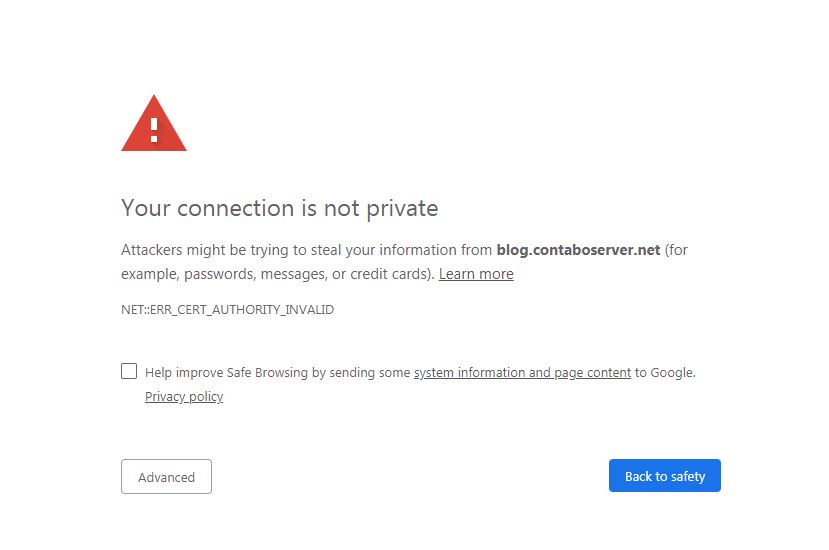
A free SSL certificate for your domain can be installed at any time within cPanel. Your website will receive automatically a free SSL certificate after 12-24 hours, however requesting the certificate manually will install it immediately.

In case your browser shows the following warning when accessing your website via https:// the SSL certificate might not be installed yet.

In order to request the certificate manually you need to login to your cPanel account, the login information was sent to you via E-Mail before.

How to save time with Control Panels


If you have a server (for example one of our VPS, Virtual Dedicated Servers or a Dedicated Server) you might ask yourself “Do I need a control panel like Plesk or cPanel, or not?”.
As the answer is not as easy as “YES” or “NO”, we are going to elaborate on why we think using a control panel is beneficial.

Direct start

If you order a server with Linux or Windows pre-installed, you will have to configure all tools by yourself. You need to install for example Apache, maybe add and configure nginx on top of it. Then install and set up the mail server. If you want to run databases, you have to install mySQL or MariaDB as well. For easy management, you might want to install phpMyAdmin on top. And of course, you want to be able to upload files as well, so an FTP server is needed, too.

If you do this on a daily basis, you should be able to have it up and running within some hours. But if you only do it every other year or have never done it before, it might take some days until you have everything installed and configured.

In addition to installing everything manually, your setup might also change from installation to installation. With most control panels, the setup is tested accordingly to a quality assurance and quality control (QA/QC) process with all components, and the recommended, standard installation will always be based on best practices. Also, the setup process includes all needed components and configures them automatically.

Less interaction per SSH or RDP

After the first steps, you might have to change some configurations or you have to install new components. For this, you have to connect to the server directly (on Linux normally per SSH and on Windows with RDP). While this is for some people the daily business, other people might struggle with it and might fear doing something wrong.

Updates

As we all know, keeping your server updated is very important, for both security and feature availability reasons. You could either do it yourself, or rely on a control panel to take care of updating the operating system.

Security

Even though your system is up2date, it could still face security issues due to misconfiguration. For example, the mail server might allow anyone to relay mails through it. Or you have a weak password and someone might be able to hack it via brute force. Many control panels come with secure pre-configured services and pre-installed tools to prevent brute-force attacks (e.g. with fail2ban).

Backups

It’s not only about Security but also about Backups. You could choose to run your own backup scripts, or you can use the built-in Backup routines of a control panel.

Monitoring and Logfiles

It’s always important to monitor your server. Are all services up and running? Is there enough space left on your hard disk? You might also have to check logfiles for debugging reasons. Both tasks (monitoring and checking logfiles) could either be done manually by you, or you could simply use a control panel, which offers internal monitoring of the services (and maybe automatically restarts the services). For logfiles, an integrated logfile-browser is a great way to debug any kind of problem you might face.

SSL Certs

The installation of an SSL Certificate is another example where a control panel saves a lot of your time. Without a control panel, you will need to install openssl. Then you need to generate a private key and a Certificate Signing Request (CSR). With this CSR you could go to your hosting provider and order a valid SSL Certificate. Based on the type of SSL Certificate, you need to confirm an email or hand in other documents.

Another alternative is Let’s Encrypt. Let’s Encrypt offers free certificates which are valid for 3 months. For this, you need to install Let’s Encrypt and configure it with your existing webserver. In addition, you need to set up a renewal process, so that all certificates get renewed automatically.

With many control panels, you can directly receive free SSL certificates which will be automatically renewed as well. If you want a different kind of SSL certificate (e.g. one which turns your browser bar green), you can generate all the needed files directly from the control panel.

Manage yourself and your customers

Adding new customers and managing them; configuring new mailboxes, changing passwords, creating mySQL users and databases – without a control panel, all these tasks must be done manually.

With a control panel, your customers can handle such tasks themselves. They can easily change things on their own, which saves time and resources for both you and your customers.

In addition, with service templates, you could ensure that the setup of new customers is always completed with the same rights and resources.

PHP versions

Based on w3techs.com, PHP is used by 79% of all the websites they scan. One of the most important topics with PHP is to stay always up2date and to be able to change the version per website. Without a control panel, you will have to do this always manually with the webserver configuration, which is way more time consuming and error-prone.

Applications and Add-ons

Applications like WordPress, Typo3, and Magento often have a long installation and configuration process: Getting the sources, setting up the database, installing it, configuring it, and so on. Many tasks need to be done even before you can start doing what you want to do. In addition, most applications have to be secured, which will take additional time as well. Most control panels have a convenient one-click installer for all common applications.

Conclusion

As you can see there are many reasons to use a Control panel, depending on your own use case.

At LikisaHost, we offer you 3 different control panels: cPanel, Plesk and Webmin. While Webmin is free of charge, it is at the same time less comfortable to manage you and your accounts. Eventually, your choice of a certain panel also depends on your operating system: cPanel can only be combined with CentOS, whereas Plesk can also be used with Ubuntu, Debian, and Windows Server.

What is more, at LikisaHost you can exclusively test Plesk one month for free and see for yourself if it fits your needs and meets your expectations!

How to start using Business Email and Enterprise Email (Flockmail)?

All you need to do is to go to DNS Zone of your domain and add the following MX records: 
mx1.flockmail.com
mx2.flockmail.com
And these TXT records: 
v=spf1 include:spf.flockmail.com include:spf.mx.hostinger.com include:relay.mailchannels.net ~all

v=DMARC1;p=none;sp=none;adkim=r;aspf=r;pct=100

Colocation – a Home for Your Hardware

One of the various business branches at Web Hosting is the provision of colocation space. In our high-tech data centers, located in Southern Germany, we offer the option of housing our clients' own hardware at a very reasonable price. Regardless of tower server, 19“ rack server, switches, firewall or external backup device, our clients are offered a low cost option to rent space and allocate power usage and bandwidth modularly as they need. Such a colocation subscription not only eliminates the burden from our clients to care for security and adequate climate conditions in their office or private environment but also takes the responsibility off their shoulders to care for an uninterrupted 24 hour availability.
Thanks to our well arranged website, it is pretty simple to configure a matching plan individually. At first it appears to be necessary to consider the exact requirements for the colocation space. Our support team will happily assist in doing so. It is required to determine in advance the number of housing modules, by regarding the dimensions of the hardware, the needed uplinks, and a matching power usage option. Nearly each and every configuration can be chosen by this convenient and user friendly tool on our homepage.

How to force redirect HTTP to HTTPS?

To redirect all traffic from HTTP to HTTPS , you have to create a .htaccess file under public_html directory and put some line of codes within the file.

You can do that easily via cPanel File Manager.
  • First of all Log into your cPanel and search for File Manager under FILES section.

  • File Manager

  • In the File Manager window that opens, click the Settings button at the top right of the page.

LEMP: Debian, NGINX + Certbot, MariaDB, PHP

This tutorial shows you how to prepare your Debian VPS for hosting your website.
We are not going to perform any fine-tuning or optimization on the default configuration files. So neither NGINX, MySQL or PHP (LEMP) will get any other than the necessary configuration changes in order to run a website properly.

1. Install the Software

NGINX, Certbot, PHP installation:
:~# apt install nginx python3-certbot-nginx php-fpm php-mysql zip unzip pwgen
MariaDB can be installed as follows:
:~# apt install mariadb-server
Installing MariaDB by using the default-package repositories might not install the latest version of MariaDB. For the latest MariaDB version visit Official MariaDB Repo and follow the instructions.

Plesk Obsidian: Try many new features for free!

13NOV/190
The new Plesk Obsidian is available for quite a while now. Time for us to introduce it and, as the title of the posting suggests, make you aware of our exclusive promotion with Plesk:
You can try Plesk Obsidian one month for free in combination with every VPS and dedicated server at Contabo! Just select your preferred edition during the order process on contabo.com in the section "Administration panel". Further information is also available on our dedicated Plesk info site.
But what are the new and interesting features of Plesk Obsidian? To be honest, there are quite a lot and it is virtually impossible to list them all in our blog. So we will just concentrate on a few of them, you are of course free to check the Plesk website for more details!

Creating a cPanel

Way to create a Cpanel
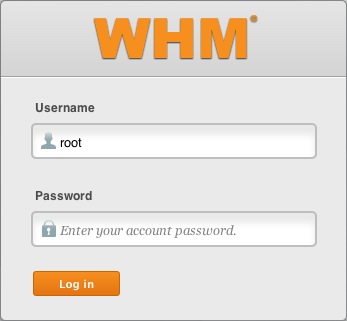
  1. Login to the WHM.
    WHM login
  2. Click Account Functions.
    Account Functions icon
  3. Click the icon Create a New Account.
    Create a New Account icon
  4. Under Domain Information enter the domain, username, password (twice) and the contact email address. 

Istoria Domain .TL


Country code Top Level Domain (sigla ccTLD) nudar estensaun (extension) ka letra hirak nebe kolokadu iha domain name nia kotuk.
Domain Name nee rasik nudar naran uniku iha mundu internet ho nian estensaun (letra iha kotuk) hodi reprezenta karater instituisaun dalaruma refleta mos paiz nia orijin.
Estensaun domain popular sira iha mundu internet mak hanesan .com ba komersial/kompania .net ba kompania IT & telekomunikasaun .org ba organizasaun no seluk tan. facebook.com google.com yahoo.com hanesan izemplu balun ba domain ho nian estensaun.
Ba Timor-Leste mak .tl (DOT TL) tuir rekezitu ISO 3166-1 Standart, nudar identidade Timor-Leste nian iha mundu internet. Estensaun domain ida ne'e mosu hafoin TL restaura nia independensia iha 20 Maiu 2002.
Iha periodu resistensia liu husi komponente resistensia no ativista soliedaridade internasional balun konsege hamosu estensaun domain .tp (dot tp) nudar akronimu ba Timor Portguese iha fulan Dezembru 1997, liu husi operador internet Connect.ie nebe ho nia baze iha Dublin, Irlandia, konteudu husi website sira ho domain .tp kuaze hotu-hotu ho materia publikasaun resistensia nian.
Liu tiha 20 Maiu 2002, TL nudar nasaun independente nebe hetan ona rekuinesimentu internasional, ho nune'e IANA (International Asign Number Authority) fo tan .tl ba TL, maibe ho estatu latutela ba ema ruma tamba estatutu .tp sei existe hela no tutela ba lider timorense Xanana Gusmao nudar kontaktu administrativu. Departamento IT hosi TL nian hato'o pedidu ba IANA iha loron 30 Augustu 2005 hodi halo alterasaun ba domain .tp hodi muda ba .tl.

Changing Name Servers of a Domain Name

  • To Modify Name Servers of your Domain Name
  •  STEP 1Log in to your control panel. Learn how
  •  STEP 2Navigate to the Order View.
  •  STEP 3Update the Name Servers.

In order to host a website on your domain name, you will need to obtain the Name Servers from the
Web Hosting company with whom you wish to host your website and point your domain name to these
Name Servers.

To Modify Name Servers of your Domain Name

Contact your Web Hosting Company and find out from them the Name Servers you need to use.
If you have purchased Web Hosting for your domain name through LikisaHost, then you need to set the 
Name Servers as specified by LikisaHost.
STEP 1:Log in to your control panel. Learn how
STEP 2:Navigate to the Order View.
Search the domain name for which you want to change the name servers and select the domain
 to view the order information.
NOTE
If the domain name is Locked/Suspended by LikisaHost, you will have to first unlock/unsuspend 
it before proceeding further.