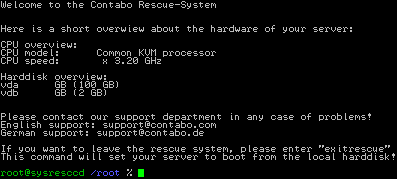
Many of you have already heard about it or even used it once in a while, but most of you have probably not been introduced to it yet: Our rescue system! While hopefully not being needed at all, it provides many possibilities to fix certain problems and to bring the machine back online as soon as possible. When the server is down, every second counts. It is important to know what to do beforehand. Thus, I will provide you with some basic information first:
Our rescue system is based on the SystemRescueCD. This is a specialized Linux distribution for recovery purposes. I can highly recommend it for private usage as well. I always carry a bootable thumb drive with me ;). The rescue system starts on our servers via PXE network boot. This has several advantages:
- It is available as long ashttp://en.wikipedia.org/wiki/Preboot_Execution_Environment the server is connected to our network.
- It boots isolated from the operating system and its settings.
- When starting it, you always enter new login credentials, which only you know.
The rescue system can be chosen for Dedicated Servers or VPS in your Contabo customer control panel. After clicking on the rescue system icon, a new page opens with a short info text, the version control, and the password prompt. This article is about the SystemRescueCD. Once you click on “Start rescue system”, your server will reboot right away.
The system will be available after a few minutes via SSH under the server IP and the default port 22. The root password is the one which you have just entered. We recommend PuTTy (command line) and WinSCP (file transfer) as Windows clients.
If you’re not sure about your admin rights, always enter the command sudo -i at the beginning of every session:
sudo -i
You will probably need access to your data. Check first which partitions are available:
fdisk -l
The root file system is usually located on /dev/sda2 or /dev/vda2. Use the following command to mount the according partition:
mount /dev/sda2 /mnt/
Your server files are now available in /mnt/
If you use Windows as operating system on your server, our rescue system can be helpful despite the different architecture. The C: drive is usually located on /dev/sda2 or /dev/vda2. The command to mount it with write access is a bit different:
ntfs-3g /dev/sda2 /mnt/
You are now set to modify configuration files or to retrieve personal data. WinSCP is perfect for those purposes.
When you have finished your work and want to boot your server normally again, enter the following command:
reboot
Your server should then boot from the hard disk again and be available as usual.
This was supposed to be a short introduction. Becoming familiar with the Linux shell and its possibilities is very advantageous. I can definitely recommend the tutorials on nixCraft for further reading.
More tutorials for certain procedures will follow, so stay tuned.
We have two alternative live systems in addition to SystemRescueCD: Debian 9 – Live which provides a graphical user interface and Clonezilla which is specialized on creating and restoring full image backups. All live systems have in common that they are always available, independently of the installed operating system.
Source: https://contabo.com/blog/system-rescue-cd-first-steps/?utm_source=support&utm_medium=email


