What are SSH Keys?
Linux servers are by default secured by a password. However, this type of authentication is not ideal from a security standpoint because your server can be vulnerable to Brute-Force-, or dictionary attacks. SSH Keys are like a “keycard” to access your server without a password.
Table of Contents
- What are SSH Keys?
- SSH Keys vs. Passwords
- SSH Key Authentication Explained:
- Generate SSH Keys:
- Uploading Public Keys to the Server:
- How to Use Your Private Key with PuTTY:
- How to use your Private Key with Pageant:
- Testing SSH Key Authentication and Disabling Password Authentication:
- Removing SSH Key Authentication and Re-enabling Password Authentication:
SSH Keys vs. Passwords
As stated in the introduction of this article, the problem with passwords is their vulnerability to Brute-Force-, or dictionary attacks. Although the security of passwords can be extended by using longer passwords or special characters and numbers, the risk of brute-force-attacks is still there. During a brute-force-attack, an automated program generates random passwords and tries to login into your server. Depending on the program itself and the performance of the machine on which this program is running such an attack can be successful in no time.
SSH Keys on the other hand are created by using the RSA-Cryptosystem. An asymmetric cryptographic system. Two keys, the public key, and the private key are generated. The method used to create these keys is so complicated that it is impossible to brute force or crack it.
SSH Key Authentication Explained:
1. An SSH Key pair, which includes a public and a private key is generated.
2. The public key is saved on your server; the private key is saved on your computer.
3. If I now try to login into my server, the server will generate a random string and encrypt it using the public key. This encrypted string can only be decrypted using the private key.
4. The server sends this encrypted string to your computer. Your computer will decrypt it with the private key and sends the decrypted string back to the server. If the decrypted string from your computer matches with the original string from the server, you are authorized and gain access to the server.
Generate SSH Keys:
Linux
If your local computer runs Linux, open a terminal.
Enter the following command to generate a pair of keys:ssh-keygen -t rsa
Depending on your version of Linux you may be prompted to choose a filename and a destination where the file should be saved.
The default path in which the keys are saved it:
/root/.ssh
While id_rsa is your private key, id_rsa.pub is your public key.
Windows
If your local computer runs Windows, we recommend installing the free program PuTTY, which includes PuTTYgen.
You can download PuTTY here:
https://www.puttygen.com/download-putty
Open the Windows search bar and search for PuTTYgen.
After opening it, this screen will appear:
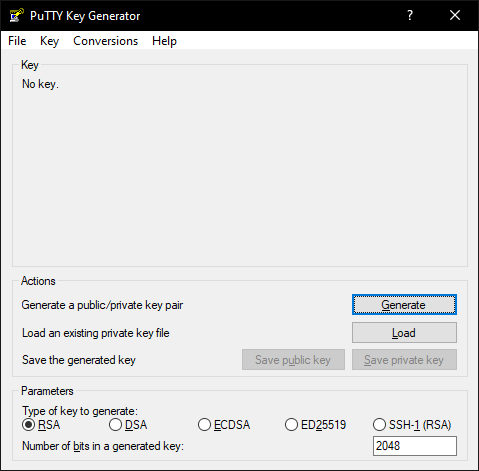
Just click on “Generate” and move your mouse over the blank field.
Your keys will be generated now.
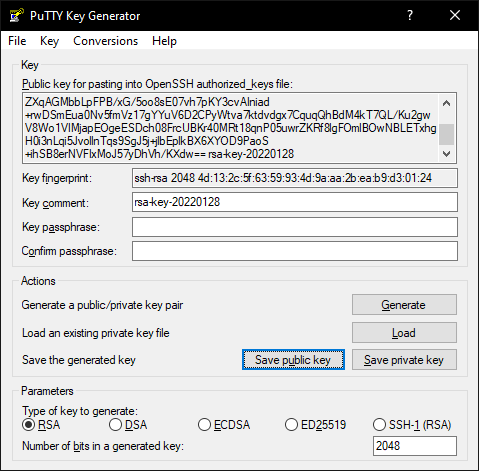
Key Comments Explained (optional)
If you want, you can assign a key comment. This comment will be integrated into your public key as well as into your private key. If you now log yourself in into your server with your key, the key comment which is similar to a name of your key will be shown on console.
Key Passphrase Explained (optional, recommended)
To increase the private keys security, you can assign a key passphrase. This will locally encrypt your private key. If you now try to connect to your sever using your private key you will be prompted to enter your key passphrase. The difference between using a normal password to connect to your server or using a private key secured by a passphrase is, that the passphrase won’t be transferred to your server. The passphrase is only used to encrypt/decrypt your private key locally. With this method it doesn’t matter if anybody gains access to your private key because they also need your key passphrase to connect to your server.
To save the public key you can either copy the whole text of the top box or click on “Save public key” followed by choosing a location in which the key should be saved.
To save the private key click on “Save private key” and choose a location in which the key should be saved.
Uploading Public Keys to the Server:
After the pair of keys had been created, you need to upload the public key to your server. This can either be done by using an FTP program or by console.
via FTP
If you want to upload your public key using FTP, start your FTP program and connect to your server as root. Create the following directory in the root-directory:
.ssh
Now create the authorized_keys text file in this folder and paste the whole public key into it. Now save the file.
via Console
Log yourself in via SSH as root. With this command you can create the right directory and switch to it at the same time:mkdir /root/.ssh && cd /root/.ssh
Now create and open the authorized_keys text file with this command:nano authorized_keys
Paste in your whole public key and save the file by pressing [CTRL+O]. To exit the editor use [CTRL+X]
How to Use Your Private Key with PuTTY:
After you’ve created a key pair consisting of a private key and a public key and after uploading your public key to your server you need to insert your private key into PuTTY.
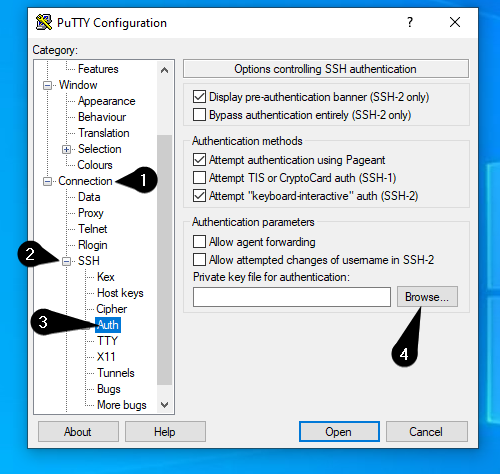
To do so open PuTTY.
On the left side you will find a list with various categories. Under Connection you will find the subpoint SSH which can be expanded by clicking on the little plus-symbol [+]. Now click on Auth. A window will appear on the right side. Click on Browse… and select your private key.
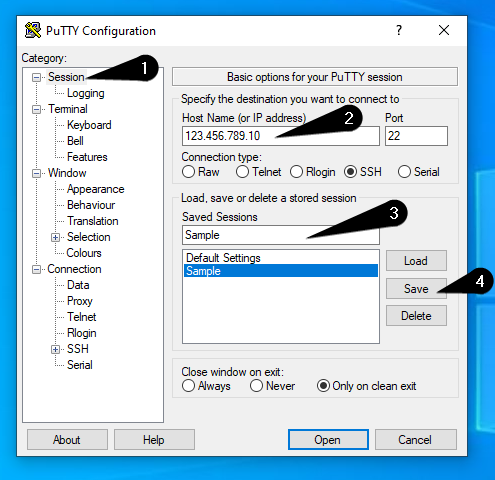
Now scroll up on the left list and click on Session.
Enter your server’s IP-Address and choose a profile name in the Saved Sessions field.
Save your profile by clicking on the Save-Button.
Now you’ve created a profile in PuTTY with your private key.
How to use your Private Key with Pageant:
Alternative to inserting your Private Key into PuTTY you can use Pageant.
Pageant is an SSH-Agent, which comes with PuTTY.
With this program it’s even easier to use Private Keys to connect to your server.
If you use Pageant you don’t need to type in your Passphrase over and over again, in case you secured your Private Key with a Passphrase.
To get started, search for Pageant in the Windows Search Bar. After executing this program, it will appear in the Windows Systemtray:
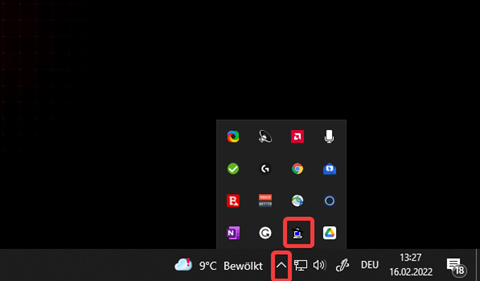
To import a Private Key into Pageant, right-click the Pagent-Icon and click on “Add Key”.
The file explorer will open and you need to select your Private Key. If you decided to secure your Private Key with a Passphrase, you will be asked to enter it.
Now you can just login to your Server without getting prompted to enter your Passphrase everytime you start an SSH connection.
Note: You need to import your Private Key again after rebooting your local computer.
Testing SSH Key Authentication and Disabling Password Authentication:
After you’ve successfully generated a key-pair, uploaded your public-key on the server and created a PuTTY-Profile with your private-key it’s now time to test if your new login method is working.
Testing SSH Key Authentication
To test if your new authentication method is working just login to your server using the PuTTY profile you’ve just created. After double-clicking on the profile, a console will open prompting you to enter your username which is usually root.
After entering the username and confirming it by pressing [Enter] you will be logged in. Besides that, the following message will appear during the login process: “Authenticating with public key <key comment>”.
Disabling Password Authentication
The reason behind choosing ssh-key authentication as your login method is server security. Therefore, it’s logical to disable password authentication now.
To do so open the sshd_config with this command:nano /etc/ssh/sshd_config
Now set the following values to “no”:
ChallengeResponseAuthentication
PasswordAuthentication
UsePAM
To avoid scrolling through the whole config to find the values that need to be changed you can open a search-field by pressing [CTRL+W]. Enter the name of the value and press enter.
If it happens that some values are commented out by a # in front of it, just remove it.
Save your changes with [CTRL+O] and close the editor with [CTRL+X]
Removing SSH Key Authentication and Re-enabling Password Authentication:
If you want to go back to password authentication all you need to do is setting the values in the sshd_config back to “yes”.
After this delete the .ssh folder and its content with:rm -R /root/.ssh
Restart the ssh service with this command:systemctl restart ssh
Source: https://contabo.com/blog/how-to-use-ssh-keys-with-your-vps/


